After reading this article you will learn about:- 1. Meaning of Sampling Inspection 2. Advantages of Sampling Inspection 3. Classification.
Meaning of Sampling Inspection:
Sampling inspection is a technique to determine whether a lot or population should be rejected or accepted on the basis of the number of defective parts found in a random sample drawn from the lot. If the number of defective parts exceeds a predefined level, the lot is rejected.
Advantages of Sampling Inspection:
(a) It involves less amount of inspection to achieve a pre-decided degree of certainty about the quality.
(b) It consumes less time, and is less expensive.
(c) Fatigue and boredom incurred by the inspectors is much less, hence their operating efficiency remains high,
(d) It is more accurate because in 100 percent inspection, errors get introduced because of the fatigue and boredom incurred by the inspectors due to large inspection work of repetitive nature.
(e) Since fewer pieces are inspected, no damage is done to the remaining pieces of the lot as they are not handled.
(f) In certain cases where the components are to be inspected by destructive testing or where a powder is to be chemically analysed, 100 percent inspection can never be employed.
(g) Rejection of a complete batch on the basis of a sample decidedly pressurizes for improvements in quality.
Classification of Sampling Inspection:
Sampling inspection may be classified as follows:
A. (Acceptance) Sampling Inspection by Attributes:
Attribute (Yes or No) inspection is used to differentiate between a defective and a non-defective part and the part is rejected or accepted without using quantitative measures. For example, if out of a sample taken from a lot a predefined number of bullets fire, the lot is accepted otherwise rejected. Attribute inspection is very important and also very common. The parts can be inspected at an isolated calm place away from the production floor.
Firstly, attribute inspection is used where components are obviously defective and non-defective. Secondly, where it is very difficult and costly to measure the quality characteristics of a product, e.g., measuring the quality of paint on a refrigerator. Thirdly, attribute inspection finds applications where the manufacturer does not see any need to measure the exact job dimensions and he feels that go and no go type of inspection can serve his purpose -as in shafts, spindles or rings. The greatest amount of sampling inspection is done using attributes.
Suppose a (manufactured) lot contains N components. The purchaser would like that the lot should contain no defective components but the manufacturer knows that under normal conditions the defective parts are not likely to be eliminated completely.
Ultimately manufacturer and purchaser strike a balance and come to an agreement that if the lot contains more than say X number of defective components, the lot will be rejected. One way to find the number of defective parts is 100% inspection which is costly and this cost again in one way or the other is recovered from the purchaser. Considering the above, both parties bring sampling inspection into the picture.
By going into the details, one finds that there is always some probability or doubt associated with the sampling inspection. A sample not necessarily always represents the true condition of the lot as it gets biased due to the/human element involved in drawing the sample from the lot.
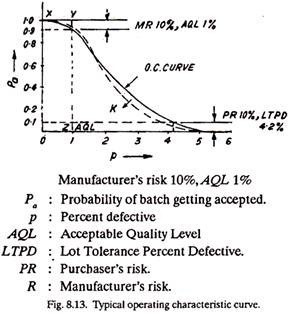
It is quite possible that by chance the sample may contain all good components, but the remaining pieces in the lot may have a big number of defective components or all the sample pieces may turn out to be defective but otherwise the lot may be excellent. So it involves a risk both to the purchaser as well as to the manufacturer. But, certain risk will have to, be borne by the two parties if they go for sampling inspection. These risks are plotted on a graph and the result is Operating Characteristic (O.C.) Curve, (See Fig. 8.13).
Steps Involved in Sampling Inspection by Attributes:
1. Select a Sampling Plan:
The first thing is to fix the proportion defective which will decide whether to accept a lot or to reject it. A purchaser always thinks about the cost of making a wrong decision, i.e., the loss he will have to bear in case he accepts a bad lot on the basis of a good sample. By changing the parameters (a and n) of an O.C. curve he can easily choose the most appropriate curve for him, the one which involves minimum purchaser risks.
(a) Manufacturer’s Risk:
It is the small probability of a batch being good or even better than AQ.L. but yielding a bad sample and thus getting rejected. In other words it is the probability of rejecting a good lot which otherwise would have been accepted.
(b) Purchaser’s Risk:
It is the probability of a lot being bad or even worse than the limiting quality but yielding a good sample and thus getting accepted. In other words it is the probability of a defective batch being accepted which otherwise would have been rejected.
(c) Acceptable Quality Level (A.Q.L.):
It indicates a small proportion of bad components in a lot such that the lots having less than this proportion of bad components have a high probability of getting accepted.
(d) Lot Tolerance Percent Defective (L.T.P.D.) or Limiting Quality (L.Q):
It indicates a small proportion of bad components somewhat larger than Acceptable Quality level in a lot such that the lots having more than this proportion of defective components have a small probability of getting accepted.
If a batch contains N pieces and a sample containing n of them is taken out, the batch will be accepted if the number of defective pieces (d) do not exceed the acceptance number (a). If the batch size is large as compared to sample size, which is commonly the situation in industrial applications, the operating characteristic curve is independent of the batch size. However (n) and (a) influence the shape of an O.C. curve. As n or a both increase, the O.C. curve shifts inside towards K (See Fig. 8.13). The dotted inner curve is for a greater value of n as compared to that of the outer O.C. curve.
2. Determine the Operating Characteristic Curve for the Chosen Sampling Plan:
As described in Step-1, a Single sampling plan involves two parameters, (n)-the sample size and (a)-the acceptance number; and a batch is rejected or accepted depending upon the criteria whether the number of defective components d in a sample (of n components) is more than the acceptance number (a) or not.
The shape of operating characteristic curve depends upon the value of (a) and (n) and accordingly it defines the risks involved or the probabilities of a good lot being rejected and a bad lot being accepted. A balance has to strike regarding the value of n. A large sample size raises the cost of selecting, handling and inspection. A small sample size does not truly represent the lot; the O.C. curve shifts away from the ideal curve (OXYZ) (See Fig. 8.13) and the chances of error increase.
The concept of ideal O.C. curve having rectangular operating characteristics (OXYZ) (See Fig. 8.13) is that the lots having not more than 1 % defective components will definitely be accepted and others with more than 1% (defectives) will certainly be rejected.
The following example will explain how to calculate the probability of a lot being accepted or rejected:
Example:
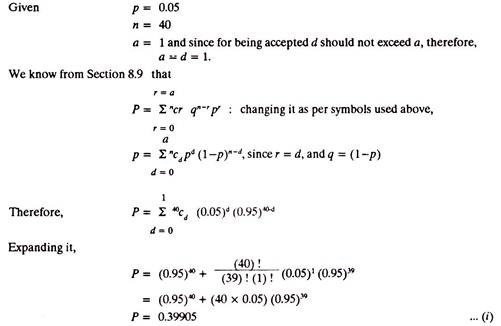
Find the probability of a lot being accepted if it has a coming quality 5% defective, a sample size of 40 and an acceptance number 1.
Solution:
The probability can also be found from the ‘Statistical tables of cumulative Binomial Probabilities.
For
n = 40
a = 1
and p = 0.05
the value of probability is 0.3991 and thus it is very much the same value as calculated in (i) above.
B. Sampling by Variables:
When inspection is carried out by measuring the quality characteristics of a product, for example its dimensions, i.e., diameter, length, thickness, weight, etc., it is called Inspection by Variables.
Variables involve the averages of measurements whereas attributes deal with percentages of parts rejected. Inspection using variables is mostly done on the shop-floor and is important for the control of operations.
Inspection using variables is more detailed, contains more information, but involves higher inspection and other costs, per unit, as compared to attribute inspection.
The manufacturer has to decide at some stage-which inspection to use, of course depending upon the requirements of his product.

