After reading this article you will learn about:- 1. Basis of Sampling Inspection 2. Application of Sampling Inspection 3. Advantages 4. Disadvantages 5. Uses 6. Procedure.
Basis of Sampling Inspection:
(i) Variable basis, and
(ii) Attribute basis.
(i) Variable Basis:
In this sampling inspection is conducted on a measurement (variable) basis, on the basis of actual readings taken. Examples of variables are dimension in mm; hardness in units; operating temperature in Centigrade; tensile strength in kg/cm2; percentage of a particular item in chemical compound; weight in kg., of the contents of any packet, time in seconds of the blow of a fuse, life in hours of an electric bulb and so on. Variables are dealt in X̅ (x bar) and R Shewhart control charts.
(ii) Attribute Basis:
In this, sampling inspection is conducted on a ‘Go’ and ‘Not Go’ basis, i.e. determining whether or not the product in the sample conforms to the specified tolerances.
Many requirements are necessarily stated in terms of attributes rather than variables. For example, the glass cover of a pressure gauge either is not cracked or it is. A lithographic paper either has certain desired colour or it has not.
Similarly, a spot weld in sheet metal either has not caused cracked edge of the sheets or it has. The surface finish of the top of dinning table presents a satisfactory appearance or it does not.
Since, majority of acceptance sampling is conducted on attribute basis, therefore, acceptance tables are formed for GO and NOT GO data.
Classification of Defects:
In sampling the defects in a product can be classified in three categories.
These defects are also known as quality characteristics of any product and are:
(a) Critical
(b) Major, and
(c) Minor
(a) Critical:
It is that defect, which renders the use hazardous and which does not allow the proper performance of the product when in use.
(b) Major:
It is that defect, which could result in the failure of the product or materially affects its usability, operation or performance.
(c) Minor:
It is that defect, which does not materially affect the usability, operation or performance of the product.
Limitation of Sampling:
In acceptance sampling, samples from a lot or process are selected and carefully inspected for detecting defective pieces and the number of these forms the basis for the acceptance and rejection of the entire lot.
Even under 100% or 200% inspection, there is no assurance that every piece conforms to the specifications as it at least partly depends on the human element and also it is a monotonous operation. Therefore “inspection fatigue” does not guarantee perfection.
In any sampling inspection, if proper control is to be achieved the sample must be selected at random. Since tools used for machining metal parts are subjected to gradual wear; therefore, samples taken from one part of the lot are not always representative of the whole lot. A representative sample is one that contains pieces selected at random from the top, middle and bottom of the container.
Application of Sampling Inspection:
The following are important places where sampling inspection is widely used:
(i) At all the places where destructive testing of product is not avoidable. In such cases 100% inspection is prohibited.
(ii) Where 100% inspection causes lot of ‘Fatigue’.
(iii) Where inspection cost is too high.
Advantages of Sampling Inspection:
(i) This is widely suitable in mass production.
(ii) This is much economical and easy to conduct.
(iii) It causes less fatigue to inspectors.
(iv) The inspector can easily and efficiently be ‘trained’ on this ‘technique’.
Disadvantages of Sampling Inspection:
It does not give definite assurance for the conformation of the specification.
Uses of Sampling Inspection in Industry:
(a) To determine the acceptability and quality of incoming raw materials, components and finished products.
(b) To determine the acceptability and quality of outgoing products, i.e., the products which are complete and ready for shipment.
(c) To determine the acceptability of work in process for further processing with in the plant.
(d) To improve and control the quality of product.
Procedure of Sampling Inspection:
Following four steps are essential in setting up acceptance sampling inspection:
1. Setting of inspection lots.
2. Arranging for rational lots.
3. Establishing an allowable percent defective.
4. Selecting Sampling Plan.
1. Setting of Inspection Lots:
Under sampling inspection the lot size varies from about 300 products upto any number. Theoretically, there is no upper limit for the lot size but in practice lots should be kept small enough so that they are easy to move and do not require special handling. For lots smaller than 300 either process inspection or screening is economical and, therefore preferable.
Another factor influencing lot size is how frequently you wish to inspect the work from one machine or process.
2. Arranging for Rational Lots:
A ‘rational lot’ is one whose units have been produced from the same source. As far as possible, a lot should consist of products manufactured from one batch of raw materials, one production line, one pattern, or die and one and the same shift.
Often it is not possible in practice to separate product as strictly as that but it should adhere to the rule of arranging rational lots as closely as possible. If we mix up products from different sources and find a bad lot, we cannot put our finger immediately upon the source of trouble which can be pointed out if there are rational lots.
3. Establishing an Allowable Percent Defective:
In mass production it is often not possible to continually produce hundred percent satisfactory products. It can be assumed that certain percentage of defectives will always remain in certain processes; however, if the percentage does not exceed a certain limit, it is more economical to allow the defectives to go through rather than to sort out each lot. This limit is called the ‘Allowable Percent Defective’.
But how to establish the Allowable Percent Defective? To do this, watch the product for some time while it is under regular operation. Collect sufficient data over a period of one to two weeks to determine the percentage of defectives normally occurring in the products from certain equipment or process.
4. Selecting Sampling Plan:
Now-a-days three important plans are in use:
(a) Single Sampling Plan.
(b) Double Sampling Plan,
(c) Sequential or Multiple Sampling Plan,
(a) Single Sampling Plan:
In inspection, defective product is one that fails to conform to specifications. The most common system in this plan is to take a single sample from the lot at random. Single sample does not mean one unit, it may have number of units. The acceptance and rejection of the lot depends on the number of defectives present in the sample.
For designing a sampling plan, the following symbols may be used:
N = Number of products in a given lot.
n = Number of Samples drawn from the lot (N) at random.
A = Acceptance number. It means the maximum allowable number of defectives in a sample size, n.
R = Rejection number.
Selection of N and n:
Selection of the values of N and n can be done in two ways:
(i) Sample inspected may have some fix percentage of lot, i.e. n/N x 100 = constant.
In such methods, percentage varies from 10 to 20%.
This method is used when lot size is comparatively small.
(ii) In this method, the value of n, i.e. sample size is obtained from Master Table for Single Sampling plan. See Table 59.1.
The procedure of single sampling plan is explained as under:
(i) Inspect a sample of n pieces.
(ii) If the number of defects found in the sampling does not exceed A accept the lot.
(iii) If the number of defects found in the sample exceeds A inspect all the pieces in the remainder of the lot.
(iv) Correct or replace all the defective pieces found.
For example, let us take that the allowable percent defective for a certain item is 1 percent. Lot size is 400. From the master Table 59.2, the sample size requirement is 75, then Acceptance number is 1 and Rejection number 2.
Now from the lot size of 400 units, take 75 units at random. Inspect and if not more than one defective piece is found accept the lot, since the acceptance number is 1. If two or more defectives are found reject the lot, since rejection number is 2.
(b) Double Sampling Plan:
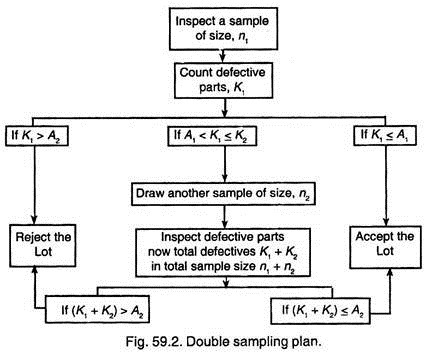
In the single sampling plan, if the sample on inspection is found defective then the entire lot is rejected. To overcome this double sampling plan is a sort of modification on single sampling plan. In this method, the lot is not rejected but again a second sample is taken to judge the quality. The procedure is explained as flow diagram shown in Fig. 59.2.
Let, n1 = Number of products in the first sample.
A1 = Acceptance number for first sample.
n2 = Number of products in the second sample.
A2 = Acceptance number for both samples.
(i) Inspect first a sample of n1 pieces.
(ii) If the number of defects found in the first sample does not exceed A1 accept the lot.
(iii) If the number of defects found in the first sample exceeds A2, inspect all the products in the remainder of the lot.
(iv) If the number of defects in first sample exceed A1 but does not exceed A2 inspect a second sample of n2 pieces.
(v) If the total number of defects in the first and the second sample combined does not exceed A2, accept the lot.
(vi) If the total number of defects found in the first and second samples combined exceeds A2, inspect all the pieces in the remainder of the lot.
(vii) Correct or replace all defective products found.
In double sampling plan, less inspection is required as compared to single sampling plan. The number of samples drawn from a lot in case of double sampling plan for first sample is comparatively quite small. In general, when the products are good enough, then very few second samples need to be taken. This causes, less inspection, i.e. less inspection cost.
(c) Sequential Sampling Plan:
The third form of the sampling plan is the sequential one. In this plan, one, two, three or more samples are drawn before it is possible to reach a decision to accept or reject the lot.
To illustrate, let us assume that the ‘Allowable percent defective’ for a certain product is 2 percent. Lot size 750 piece each.
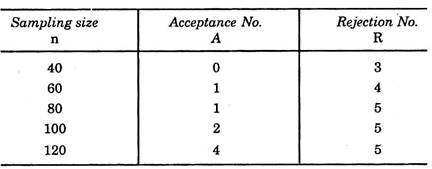
Now from the Master Table 59.2 of sequential sampling plan the following information is collected.
Now begin by selecting 40 sample pieces at random from the lot. If there are no defectives, accept the lot, since acceptance number is 0. If there are three or more defectives reject the lot as the rejection number is 3. When the defectives found are between the acceptance and rejection numbers, i.e. 1 or 2 in this case the lot can neither be accepted nor rejected. Now, collect additional information by taking another sample of 20 from the lot. This brings the total sample size 60 = (40 + 20).
Again compare the total number of defectives found to determine whether to accept or reject the lot or to continue sampling. This process may go on until the highest sample size 120 is reached at which the gap between the acceptance and rejection number disappear and the problem of acceptability solved.
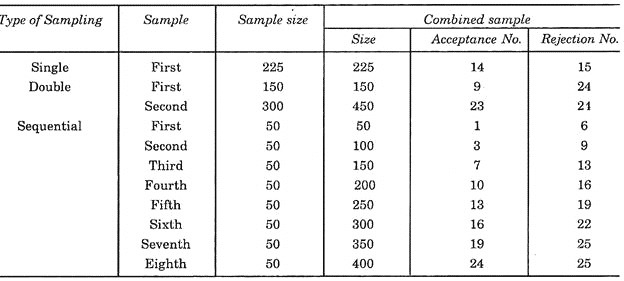
The following table shows the comparative size of samples with their acceptance and rejection numbers developed for single, double and sequential sampling plans.
From the table it is found that sequential sampling requires comparatively much less inspection then single and double sampling, hence widely adopted. Still there are some plans where single sampling is preferred. The reason being their material handling problems.
For example, if the product is heavy and difficult to transport, such as heavy coils, large castings, heavy large machine parts etc., it will be less costly to move a large number of sample articles to a place of inspection once instead to transport much smaller number of articles several times.
Sampling of Continuous Products:
Continuous products like chains, belts, ropes, metal, coil, yarn, wires, cloth, cord etc. often require a considerable amount of visual examination for defects. For such products, Master Sampling Tables are also given. In this, size is considered as the basis of units of length.
For example, for such a product, if 20% defectives are allowed, then in a single sampling plan for a lot size 9999 or less, sample size is 675, A = 22, B = 23, it means inspect 675 metres length of product, if 22 metres length or less is found to be defective accept the lot but if 23 or more is found to be defective, reject the lot.


